Introducing our JavaScript SDK: DocuSign.js
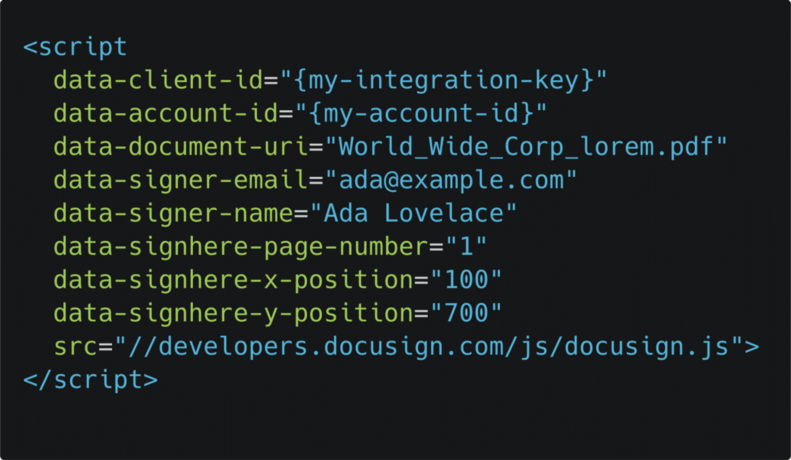
As most people know by now, at DocuSign, we never stop innovating. I am a Lead Software Engineer on the Developer Center team, and we’re responsible for all of the great tools and technologies we offer to developers to enable the integration of DocuSign technologies into their apps, websites, and systems. We have many APIs and server-side SDKs in seven programming languages (C#, Node.js, Java, PHP, Python, Ruby, and Apex), and mobile SDKs in four programming languages (Objective-C, Swift, Java, and Kotlin). We also create developer tools such as API Explorer, Postman collections, IDE extensions (Visual Studio and Visual Studio Code), and more.
Today I am excited to announce that we’re adding to our family of tools with the beta release of a new client-side SDK we call DocuSign.js. Built in vanilla JavaScript, this library works with any JavaScript framework and lets you easily incorporate DocuSign functionality into your browser-based applications.
It’s no secret that there are many types of applications, so their associated architectures are dependent on many factors, including:
- Desired functionality, use cases, and requirements
- Selected technology stack
- Programming language(s)
- Coding experience
I know you are probably anxious to dive into how to use DocuSign.js, but first let’s take a moment to see how it fits into the architecture of your DocuSign integration. Refer to this diagram for the short discussion that follows:
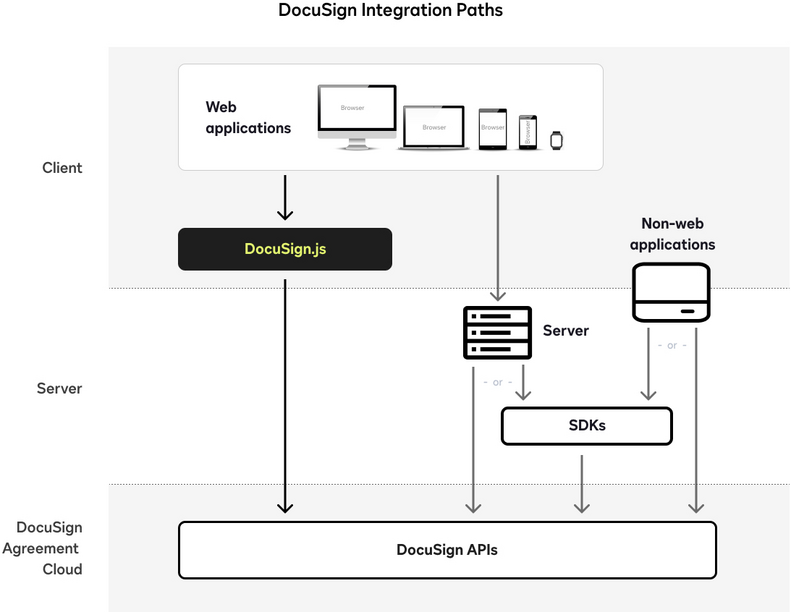
Non-web applications in the diagram above represent a large category of applications that are not browser-based, including back-end Enterprise Resource Planning (ERP) systems, cloud apps, and many others. These non-web applications can incorporate DocuSign functionality by making calls directly to any of our APIs, or by using our server-side SDKs (which in turn make calls to our APIs). Non-web applications can run on a server, including middle tiers (which is not shown in the diagram), or on a client, such as a Windows desktop app.
By contrast, web applications are browser-based and they run on a plethora of devices, such as desktops, tablets, phones, and watches. Like non-web applications, web applications can interact with a web server or middle-tier server. If that’s the architecture they use, a web application can also incorporate DocuSign functionality by directly calling any of our APIs or by using any of our server-side SDKs. However, a web application may not be interacting with a server. Instead, they may communicate with APIs and services directly from the client (browser). In this case, with just a few lines of code, you can incorporate DocuSign.js, which wraps the functionality of our APIs into your browser code with simple JavaScript.
DocuSign.js incorporates features from many of our APIs, including eSignature, Click, Rooms, Admin, and Monitor. However, to keep this blog post as short as possible, I will only cover our eSignature and Click APIs. Please comment on this post if you’d like to see me write additional blog posts on any of the other APIs.
With all the intro behind us, let’s dive into the fun stuff: how to use DocuSign.js. In this blog post, I want to give you an idea of the power of DocuSign.js, so I present three separate scenarios, but these are not the only ones you can use with DocuSign.js. The sky’s the limit.
One-time setup
Before you can start your browser integration with DocuSign.js (including all three scenarios I show you in this blog post), you need to set up and configure a few things first. These are easy to do, but you have to do them in a specific order:
- If you don’t already have a free DocuSign developer account, create one. If you do, log in to that account.
- Create an app in the Apps and Keys page in the DocuSign developer account you are using from step 1. Apps consist of an app name that you specify (ecommerce web application for my example in this blog post), along with a few parameters that collectively are referenced by an automatically-generated GUID value known as an integration key or sometimes referred to as clientId. The parameters I mention are specific to the type of OAuth authentication your app needs to use. For a web application that uses DocuSign.js, you need to use Implicit Grant, because a serverless application can’t secure an OAuth client secret. To keep this post as short as possible, I don’t cover the steps here, but you can visit our Implicit Grant how-to or check out this quick video to show you how to configure a new app:
Note: For scenario 1, I’ll show you how to use DocuSign.js with an embedded signing session, which requires a redirect URI, but you won’t know what this value is until after you follow the instructions in this post. It’s kind of a chicken/egg scenario, so you’ll need to return to the Apps and Keys page and select your configured app to modify the redirect URI. I’ll explain this later in the Scenario 1 section of this blog post.
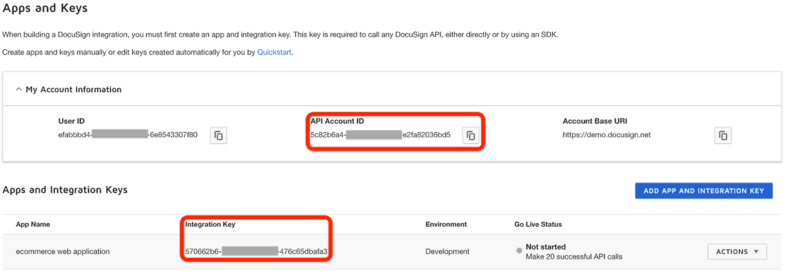
- In the Apps and Keys page, copy the values for the Integration Key (which is specific to a configured app) and API Account ID (which is specific to your account), as you’ll need them in the DocuSign.js code snippets that I’ll show you shortly. If you’ve configured your app correctly, your Apps and Keys page should look something like this:
Scenario 1: Embedded signing
OK, so this is what you’ve been waiting for: we’re finally ready to start coding. Suppose you have an application requirement to capture contact information and signatures for customers to sign a liability waiver. The JavaScript code will need to include the Integration Key and API Account ID values that you configured in the One-time setup section of this post. You’ll also need the full URL path of a document that you want users to sign, and the signer's name and email address, but I’ve provided a sample document for you for your first exercise.
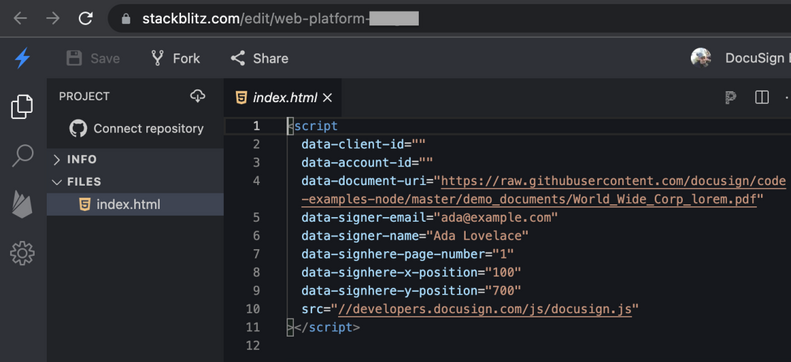
To build a quick prototype for this blog post, I’ll show you how to use StackBlitz, which is an online development environment. To make it even easier for you to try it out, I’ve uploaded some HTML code (including a basic JavaScript that is preconfigured to reference DocuSign.js) to a sandbox that you can use immediately to follow along. For this scenario, DocuSign.js requires a single HTML file containing one <script> tag with nine attributes. The forked sandbox for this scenario is located at https://stackblitz.com/fork/web-platform-akm4nx and looks like this:
To finish coding this scenario, follow these few steps:
- The code area in the center is where you configure your JavaScript code to reference DocuSign.js, and specify its attributes to suit the needs of your web application. Each of the attributes are described in detail in the Appendix section of this blog post, but the only ones you need to modify for this scenario are:
data-client-id: The Integration Key value you copied in the One-time setup section of this post.data-account-id: The API Account ID value you also copied earlier.
- Copy the unique URL of your new StackBlitz web application by right-clicking Open in New Window at the top-right of the screen, and then click Copy link address.
- Return to the Apps and Keys page for this app (you configured it earlier in this blog post), paste the link address you copied in the previous step into the Redirect URI field, and then save your app.
Now that you’ve configured your DocuSign app and written some code to specify DocuSign.js attributes in the StackBlitz environment, you are ready to test it to see how the DocuSign.js integration works.
Open a StackBlitz preview window by clicking Open in New Window at the top-right of the screen. If this is the first time you are running the new web application with DocuSign integration, you’ll see the following prompt, where you need to grant a one-time consent that allows access to the app you configured in the Apps and Keys page (named ecommerce web application) to use your account:
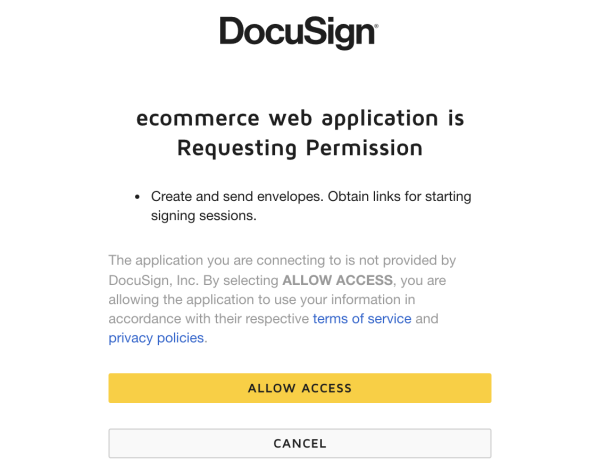
Once you click ALLOW ACCESS, the DocuSign signing session will be displayed:
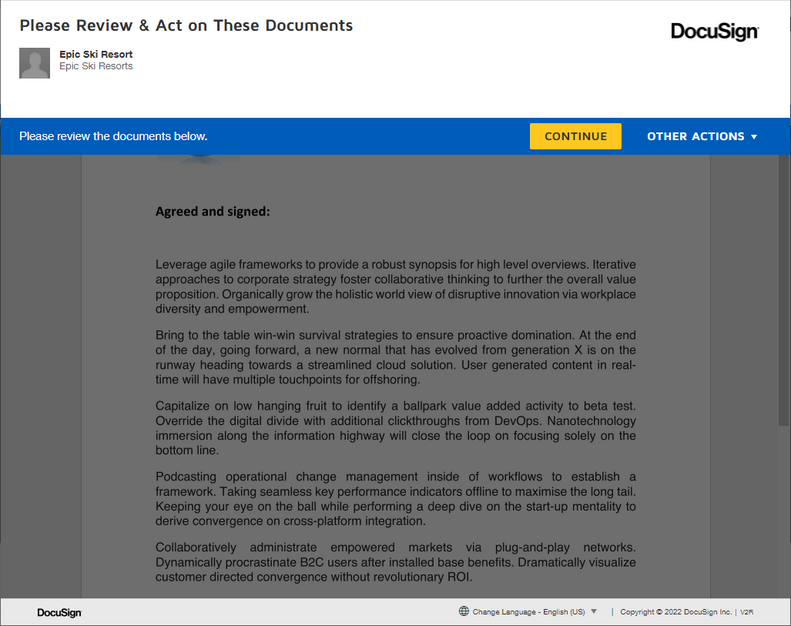
After signing is complete, DocuSign.js redirects the browser back to your StackBlitz URL. You’ll notice a parameter in the redirected URL that shows event=signing_complete. This is typically where your app will display a notification to the signer that the transaction has been successfully completed.
In an embedded signing workflow, the sender is required to log in again if the DocuSign session expires. While this makes sense for in-person transactions, such as a signing scenario on a point-of-sale terminal at a physical store, sometimes you need to account for a different workflow that occurs when someone is not physically present to sign on the same device from where the transaction was triggered. This is what we call a sessionless workflow.
Scenario 2: Sessionless workflow
Suppose a customer wants to sign a form at home, away from where your web application that uses DocuSign.js is running. That’s where DocuSign PowerForms can help by enabling a sessionless workflow. DocuSign PowerForms are public shareable links, created from templates, that prompt signers to complete a transaction. Anyone with the link can sign a PowerForm document, but the PowerForm creator can optionally require signers to verify their identity before they can even access it. To learn more about PowerForms, watch the Programming PowerForms video.
To initiate a sessionless workflow by using DocuSign PowerForms and DocuSign.js in your web applications, follow these steps:
- Log in to your developer account.
- Create a new DocuSign template by clicking New, then Create Template under the Templates tab, like this:

This will open the Template Name and Description screen.
- Give the template a name, click Upload, and then select the desired document that serves as the template to be signed.
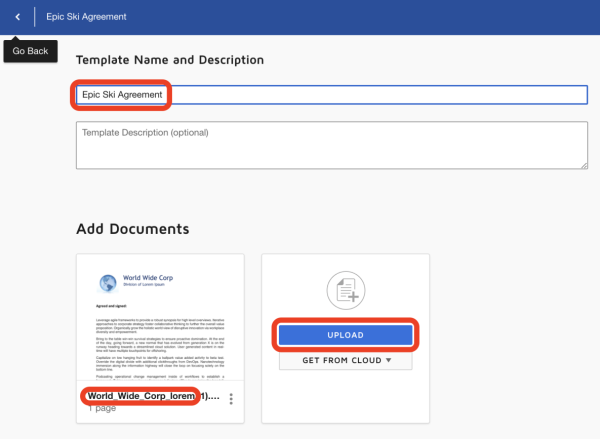
- Scroll down to the Add Recipients section and enter a value of signer in the Role field. The name you assign to the role is important because it will need to match the role you’ll enter in the code later.
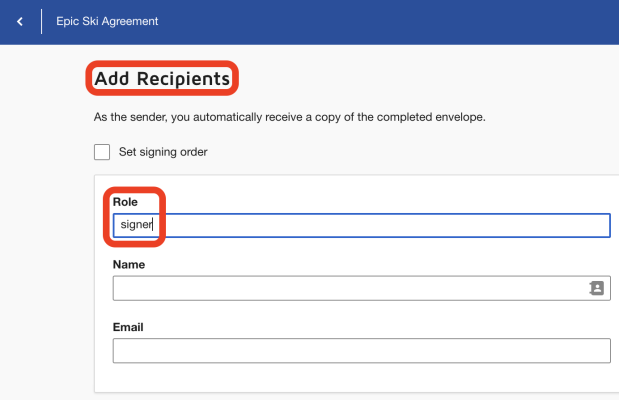
Click Next to open a screen that we call the tagger.
- Add document elements called tabs to the document by dragging and dropping them onto the document surface. We will use a Signature tab (to prompt recipients to sign the document) as well as a Text tab (to enable text input during the signing process).
- Click the Text tab you just placed, expand the Data Label property, and enter a value of acknowledgement so this Text tab can be referenced in code.
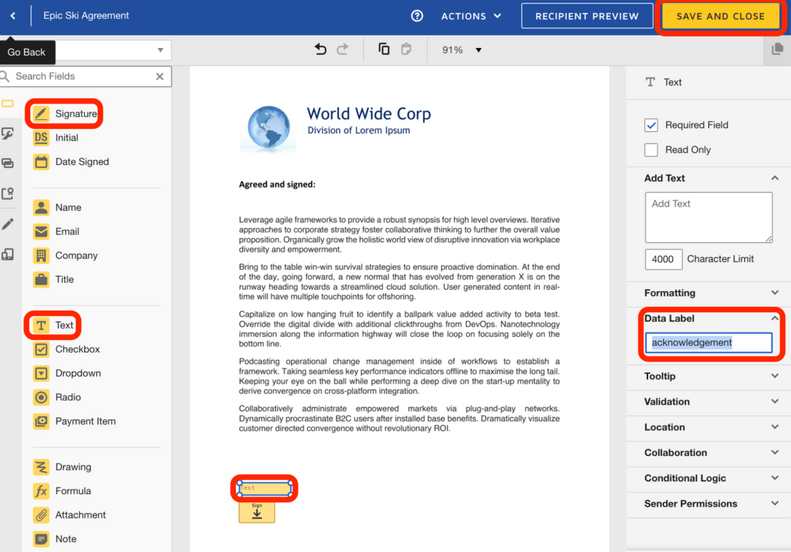
- Click Save and Close. The new template appears under My Templates.
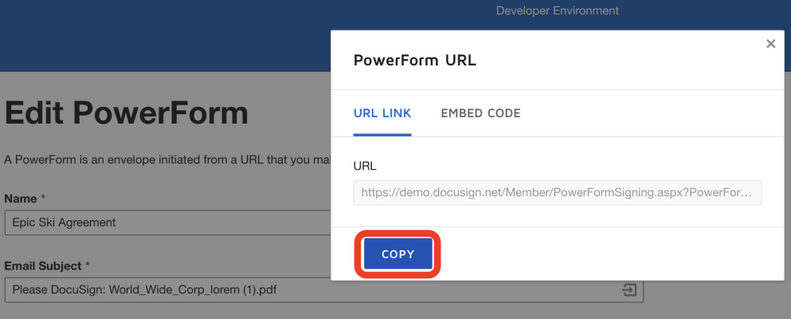
- Click Use and then select Create PowerForm.

- In the PowerForm URL screen that pops up, click Copy to copy the new PowerForm URL.
- Just as you forked a StackBlitz project in the embedded signing section of this post, you can fork a DocuSign.js PowerForm example on StackBlitz at https://stackblitz.com/fork/web-platform-prsbvt. It looks like this:

Note that the sessionless workflow in this scenario does not use the same nine attributes that you used in the embedded signing section of this post.
- Paste the PowerForm URL you copied in step 9 into the
data-powerform-urlattribute value. - Click Save and reload to see the DocuSign signing experience, as shown here.
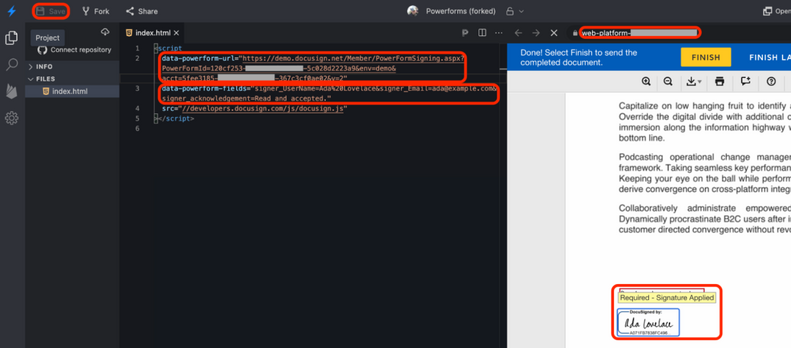
I’d like to call out a few things about the screenshot above. You’ll notice that the signing screen is prefilled with dynamic text that shows “Read and accepted.” You’ll also notice a signature tab prefilled with the name of Ada Lovelace.
If you look closely at the HTML file on the left-hand side, there is an attribute called data-powerform-fields at the third line whose value is composed of three parts, separated by an ampersand character (&). Each part is in the format of role_field=value.
The role of signer matches the one defined when creating the DocuSign template. The field can be the name of a predefined DocuSign field, such as Email or UserName, but can also be a custom field that you define, such as the Text tab we labeled as acknowledgement when we created the template in step 6 above. The value you enter for each will actually show on the document, as you can see in the screenshot above. For more information about how to prefill PowerForm fields, see Populate Custom Document Fields in a Web PowerForm.
Scenario 3: Inline agreement flow
Now that I’ve covered the DocuSign.js integration with our eSignature API, I’ll show you a bit about the integration with our Click API. DocuSign Click enables users to accept or acknowledge a document with a single click. An example of when you might want to use Click might be if, say, you have a license agreement or basic terms and conditions that you want a user to accept before continuing down a workflow path on a website. The document and its configured properties (such as whether you want to require a user to read the entire document before agreeing to it) are known as a clickwrap. Clickwraps are designed to be displayed either inline or as a pop-up modal. Let me show you how to create an inline agreement with DocuSign Click. Just follow these steps:
- Log in to your developer account, or return to it if you’re already logged in.
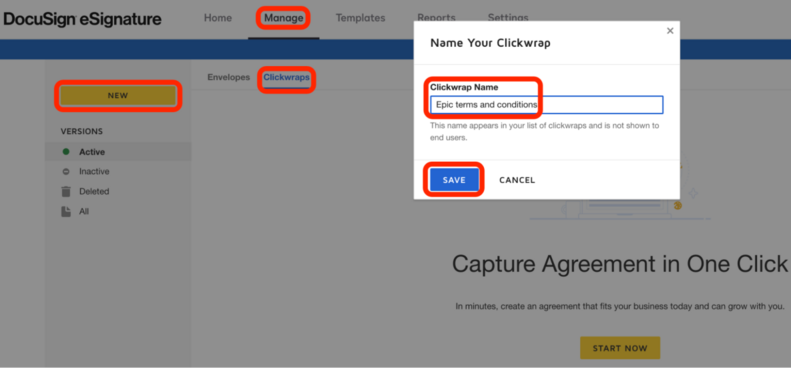
- Under the Manage tab, select Clickwraps and then click NEW.
- On the Name Your Clickwrap dialog, enter a Clickwrap Name and click SAVE.
- In the clickwrap design tool, select Add Document and select a document.
- Supply a Display Title, select Inline as the Format, and select Link under Document Display.
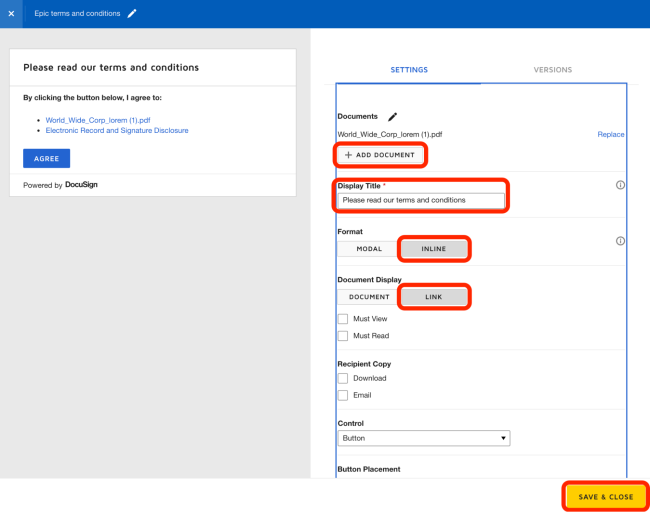
- Click SAVE & CLOSE.
- On the Activate New Version prompt, select Activate Now.
- Click Copy Code on the clickwraps list page.
- On the Copy Code window, copy the GUID value next to
clickwrapIdand click CANCEL to close the window. You don’t want to copy all of this code because you only need theclickwrapIdvalue.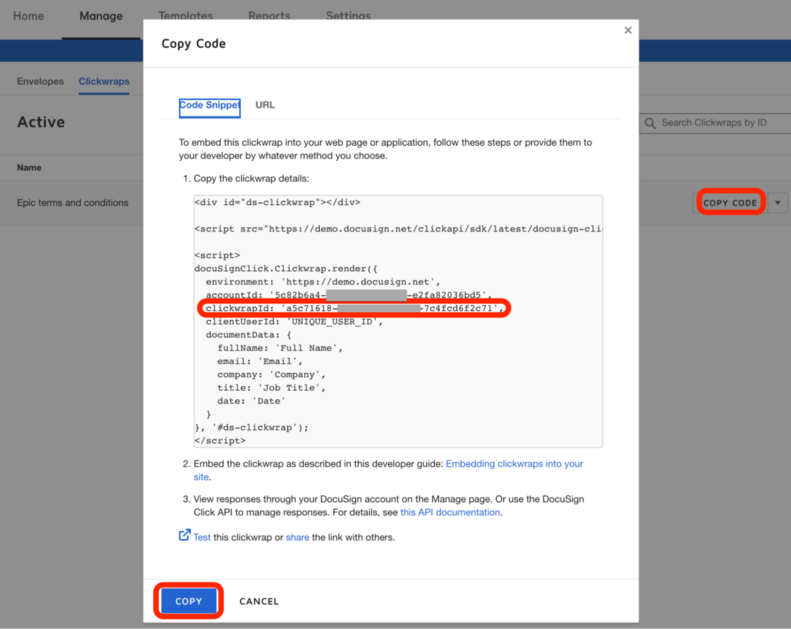
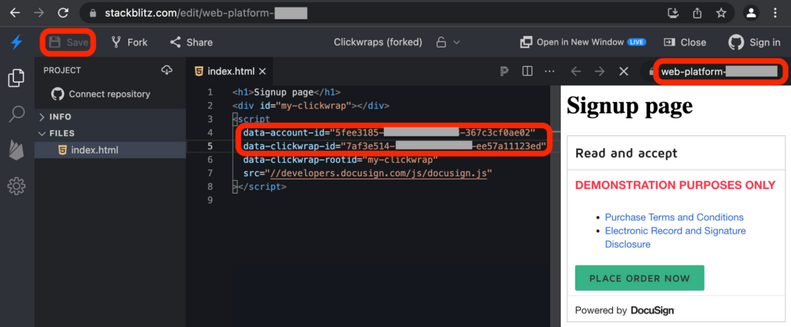
- To test this using DocuSign.js, fork this StackBlitz project.
- As you saw in prior scenarios in this blog post, each of the attributes are described in detail in the Appendix, but the only ones you need to modify for this scenario are:
data-clickwrap-id: TheclickwrapIdvalue you copied in step 9.data-account-id: The API Account ID value you copied in the One-time setup section of this post.data-clickwrap-rootid: This identifies, on the HTML page where you will host the clickwrap, the HTML element (usually a<div>) that will contain the clickwrap code.
- Click Save and reload the URL that was created.
Now we have a signup page where we can collect a user’s consent to terms and conditions.
Go-Live
All documents that are signed with DocuSign developer accounts are stamped with a red watermark indicating that they are for demonstration purposes only. You need to purchase a DocuSign plan to use your code in production (which gets rid of the watermark). Migrating your app from the DocuSign development environment to the production environment involves a process we call Go-Live.
After you follow the go-live process to migrate your app (including its integration key) to production, you need to have these attributes in your DocuSign.js client code to point to the production environment:
data-production="true"data-environment="{your_assigned_datacenter}"data-proxy="https://{your_full_cors_proxy_url}"
As I’ve mentioned a couple of times already, each of the attributes are described in detail in the Appendix section of this blog post, but here’s a few things to know:
data-environmentis automatically assigned to your production account and is based on your physical location. See the appendix for more information about where to find this value.data-proxyis an HTTPS Cross-Origin Resource Sharing (CORS) proxy URL to be used in the production environment to act as a gateway between DocuSign.js and the DocuSign platform. For more information about CORS, see Building Single-Page Applications with DocuSign and CORS: Part 2.
That’s all for now. We love to hear from you, so please submit any suggestions in this feedback form and don’t forget to subscribe to the DocuSign developer newsletter.
Additional resources
- DocuSign Developer Center
- @DocuSignAPI on Twitter
- DocuSign for Developers on LinkedIn
- DocuSign for Developers on YouTube
- DocuSign Developer Newsletter
Appendix: list of data attributes
data-account-id: The API Account ID GUID value from the top of your Apps and Keys page in your DocuSign developer account. You can see how to configure this value in the One-time setup section of this post and is shown in scenarios 1 and 3.data-clickwrap-id: The unique ID of a DocuSign Click clickwrap. See scenario 3 to learn how to locate this value.data-clickwrap-rootid: The ID of the HTML element that will contain the clickwrap code on the page where the clickwrap will be rendered.data-clickwrap-userid: A unique user ID to identify each end user who signs a clickwrap. You can specify your own value, or DocuSign will auto-generate a GUID for you.data-client-id: The Integration Key GUID value for the app you configured in the Apps and Keys page in your DocuSign developer account. You can see how to configure this value in the One-time setup section of this post and is shown in scenarios 1 and 3.data-document-uri: A local (to your web app’s domain) or remote URI that represents the location of the document to be signed.data-environment: In a production environment, this is the data center location (for example, na1, na2, eu, au) of your production account. This value can be extracted from the Account Base URI on the Apps and Keys page: for example, https://na1.docusign.net. If this value is not supplied, the location is determined by thedata-productionattribute. A blank or missingdata-environmentwith adata-productionvalue oftruemeans that the default value ofwwwwill be used. A blank or missingdata-environmentwith adata-productionvalue offalseor blank means that a value ofdemowill be used.data-iframe: A boolean that indicates whether to use an iframe or redirection for an embedded signing flow. Defaults tofalse, which means that redirection will be used.data-powerform-fields: A list of DocuSign PowerForm fields that will have values substituted at runtime. Each field is composed of three parts, separated by an ampersand character (&). Each part is in the format ofrole_field=value. See scenario 2 for more information about how to specify these fields.data-powerform-url: If you are using DocuSign PowerForms, this is the complete URL of the PowerForm. See scenario 2 to find out where to get this value.data-production: This indicates whether your JavaScript code runs in production if set to a value oftrue. This attribute is optional if your code will run in your developer account (or it can be set to a value offalse).data-proxy: An HTTPS Cross-Origin Resource Sharing (CORS) proxy URL to be used in the production environment to act as a gateway between DocuSign.js and the DocuSign platform. For more information about CORS, see Building Single-Page Applications with DocuSign and CORS: Part 2. If you don’t have an HTTPS proxy to use, deploy the official DocuSign proxy by following the steps outlined in our HTTPS CORS Proxy in Node.js guide. Supported technologies include Node.js, Docker, AWS, Azure, and Heroku.data-signer-email: The email address of the recipient who signs a document.data-signer-name: The full name of the recipient who signs a document.data-signhere-page-number: The page number within a document where a signature tab will be placed for signing. I didn’t guide you through specifying this attribute value, but the StackBitz project you ran in scenario 1 does have a predefined value of1(for the first page).data-signhere-x-position: The horizontal offset from the left side of the page where the signature tab will be placed for signing. See Fixed positioning for more information. You also didn’t specify this attribute value, but it was in the StackBlitz project you tried in scenario 1, with a predefined value of100.data-signhere-y-position: The vertical offset from the top of the page where the signature tab will be placed for signing. See Fixed positioning for more information. Just like the x position, scenario 1 had a predefined value, but it is700.
