Using the DocuSign REST API to Add Additional Documents to an Envelope
Guest blog by Todd Withers, President and Chief Technology Officer, General Networks
Recently, a client asked us to write code that would initiate a DocuSign envelope through the DocuSign REST API. I have done this many times before but this time there was a twist: my client wanted me to use a specific DocuSign template that contained one document but she wanted to be able to provide a variable number of documents for the envelope at run-time. The document in the template was a simple contract but in some cases, my client wants to include multiple simple contracts in a particular envelope. I hadn’t done this before but I was pretty sure I could manage and along the way I learned several lessons that I share in this blog post.
Lesson 1: Don’t use template matching
Template matching is a great feature in DocuSign where it analyzes the document you submit for signature and automatically chooses the appropriate DocuSign template. This works really well in the DocuSign user experience because the user can see the template selected and take action as needed. However, through the API this kind of interaction is problematic since the goal of using the API is often to eliminate the need for user involvement. So in this case, when you POST your envelope, you should specify the DocuSign template to be used like this:


"templateId": "1345312b-f341-abc3-9178-44h15f7d1gha"Lesson 2: Use “AutoPlace” with invisible text! A key problem with adding additional documents at runtime is making sure that the signature and related fields get placed correctly on the additional documents. AutoPlace to the rescue! If you haven’t used the DocuSign AutoPlace feature, you should give it a try because it’s really useful (read about it here). In our use case, we will add additional documents at run time, so this feature is critically important to making the whole thing work. My preferred method is to use “invisible text” (white text on a white background) but visible text works just as well as long as it’s unique in each document.
Step 1: Create the invisible text in the template document
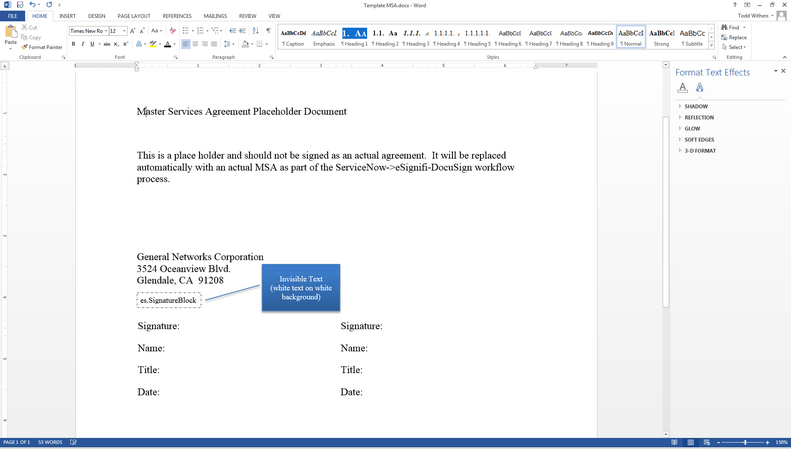
In my case, I used a Microsoft Word document in my DocuSign template so I started by adding the invisible text as shown below. I entered “es.SignatureBlock” for my invisible text since it’s important to use something unique.Step 2: Upload the template document to the DocuSign template
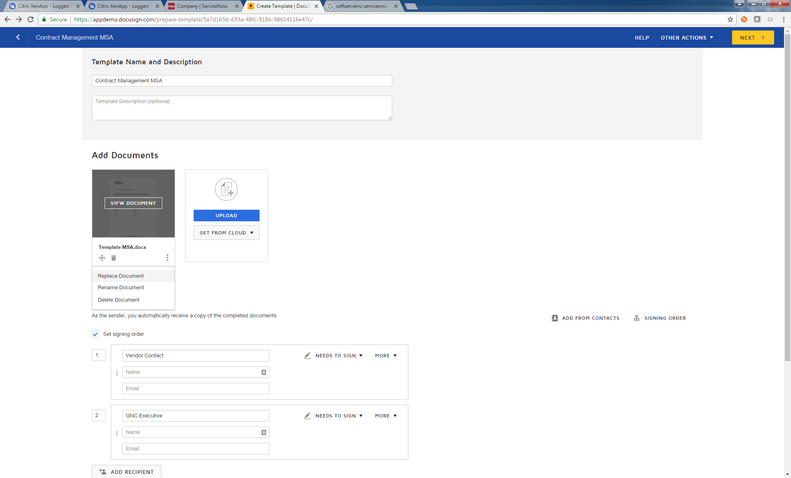
Next I needed to upload the updated document to my DocuSign template. I simply edited the template in the DocuSign template editor and replaced the document as shown below.Step 3: AutoPlace the signature fields
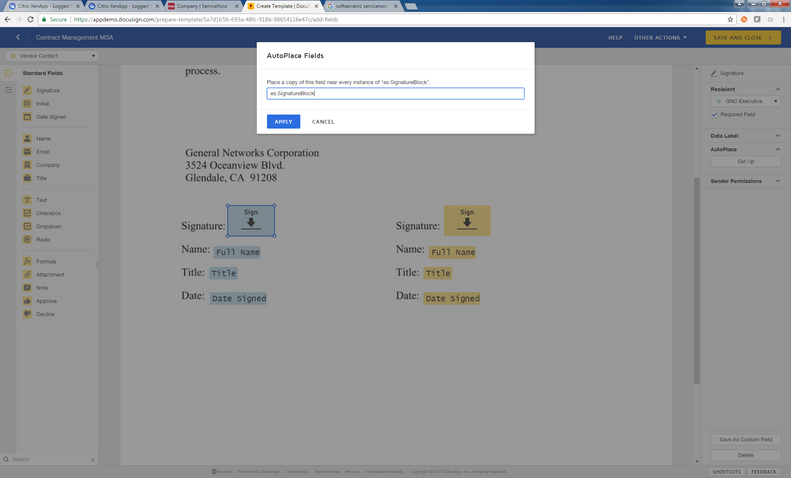
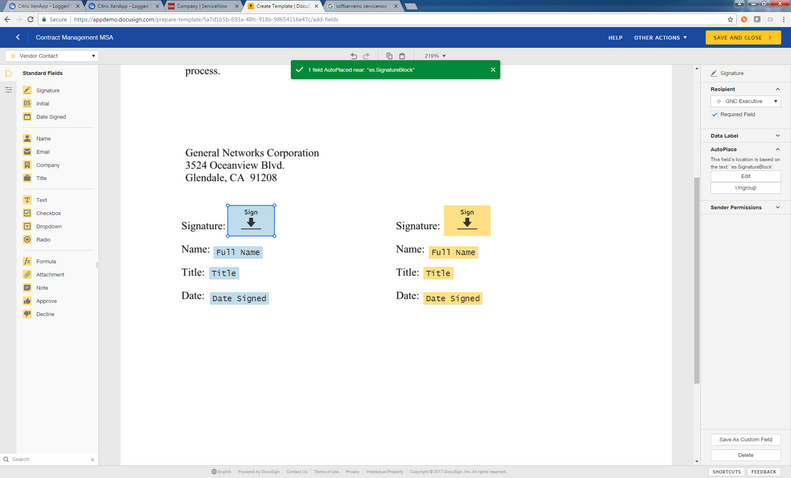
Finally, I needed to AutoPlace the signature fields so I clicked on a signature field, clicked “Setup” under the AutoPlace menu and entered my invisible text as shown below. You will see a message like this: You will usually need to move the signature to the right spot but don’t fear because DocuSign will continue to track the position of the field relative to the invisible text. Now just repeat the process for each of the other signature block fields and you’re done. Now the magic: with this in place, signature fields can be automatically added and placed for each additional document you add to the envelope through the API as long as those documents also include the invisible text. This completely eliminates the need for user interaction in placing signatures or signature tags! Lesson 3: Take a 4-step approach Usually, when I initiate an envelope through the DocuSign API, I POST the envelope as “Sent”. This allows me to complete the entire task with one call and is usually the most efficient approach. However, if you want to add additional documents, you need to take a 4-step approach as follows:Step 1: POST the envelope as a draft
This will create the envelope and assign an Envelope ID but won’t actually send it: Endpoint: https://demo.docusign.net/restapi/v2/accounts/<account ID>/envelopes Method: POST Sample Body{
"emailBlurb": "An envelope needs signing!",
"emailSubject": "Signing request",
"status": "created",
"templateId": "1345312b-f341-abc3-9178-44h15f7d1gha",
"templateRoles": [{
"name": "<insert name>",
"email": "<insert email>",
"routingOrder": "1",
"roleName": "Manager"
}]
}
Step 2: Add the additional document(s)
Now that the draft is created, you can add all the documents by making a PUT request to the following. Please note that you’ll need to convert the file binary to base64.
Endpoint: https://demo.docusign.net/restapi/v2/accounts/<account ID>/envelopes/<envelope ID>/documents
Method: PUT
Sample Body
{
	"documents": [{
		"documentId": "2",
		"name": "Additional Document 1.pdf",
		"order": "2",
		"pages": "1",
		"documentBase64": "<insert base64 content here>"
	}]
}
Step 3: Apply the original template to each added document
Now, we need a way to tell DocuSign to run AutoPlace for the newly added document. We do this by applying the template used to create this envelope to each new document added. If any invisible text is found to match an AnchorString in the template, the field is created and positioned automatically in the added document.
Endpoint: https://demo.docusign.net/restapi/v2/accounts/<account ID>/envelopes/<envelope ID>/documents/<document ID>/templates
Method: POST
Sample Body
{
	"documentTemplates": [{
		"templateId": "1345312b-f341-abc3-9178-44h15f7d1gha",
		"documentId": "2",
		"documentStartPage": "1",
		"documentEndPage": "1"
	}]
}
Step 4: Send the envelope
With the documents added and templates re-applied, simply do a PUT on the envelope to send it out.
Endpoint: https://demo.docusign.net/restapi/v2/accounts/<account ID>/envelopes/<envelope ID>
Method: PUT
Sample Body
{
	"status": "sent"
}
The result
The envelope is sent with multiple documents, each of which has appropriately AutoPlaced signature fields – All of this with no user interaction. The result is a significantly more efficient process which can lead to great return on your DocuSign investment.
See you in San Francisco at Momentum!
I’ll be speaking at the DocuSign Momentum conference from May 3-4 in San Francisco. Come hear my session, Seamlessly Integrate DocuSign into ServiceNow Workflows. Developers can attend the conference (and my session) for free by registering here.