Common API Tasks🐈: Retrieve the User’s Profile Picture

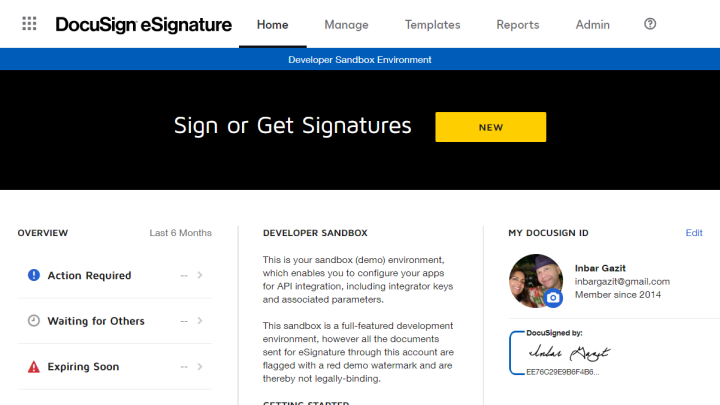
Hello everyone, and welcome to a new post in our Common API Tasks series. In this post, we’ll talk about your profile pictures and how you can retrieve them using DocuSign’s eSignature REST API. If you have already started using our developer sandbox environment (also known as demo). If you have gotten a chance to explore the API, you may have seen that you can customize the profile picture of the user logging in to the DocuSign eSignature environment. For example, here is my developer sandbox showing a customized profile picture:

You can make your integration more user-friendly by retrieving this profile image using the API and displaying it in your app. I’m going to show you code examples demonstrating this functionality in all six of our SDK languages. Note that, in addition to retrieving the profile image, you can also use the eSignature REST API to update and delete the image.
What you will need:
- An AccessToken to make API Calls
- A BasePath (URL) to make API calls
- The AccountID (GUID) for your DocuSign account
- The UserID (GUID) for the specific user whose profile image will be retrieved
After you run this code you’ll get a profile.bmp file, which is a bitmap image file with the profile image, such as this one:

Here is the code to make the magic happen:
C#
// You would need to obtain an accessToken using your chosen auth flow
var config = new Configuration(new ApiClient(basePath));
config.AddDefaultHeader("Authorization", "Bearer " + accessToken);
var usersApi = new UsersApi(config);
var stream = usersApi.GetProfileImage(accountId, userId);
var imageFile = File.Create("profile.bmp");
stream.CopyTo(imageFile);
imageFile.Close();
Java
// You would need to obtain an accessToken using your chosen auth flow
Configuration config = new Configuration(new ApiClient(basePath));
config.addDefaultHeader("Authorization", "Bearer " + accessToken);
UsersApi usersApi = new UsersApi(config);
byte[] image = usersApi.getProfileImage(accountId, userId);
FileOutputStream imageFile = new FileOutputStream("profile.bmp");
imageFile.write(image);
imageFile.close();
Node.js
// You would need to obtain an accessToken using your chosen auth flow
let dsApiClient = new docusign.ApiClient();
dsApiClient.setBasePath(basePath);
dsApiClient.addDefaultHeader('Authorization', 'Bearer ' + accessToken);
let usersApi = new docusign.UsersApi(dsApiClient);
var image = await usersApi.getProfileImage(accountId, userId);
fs.writeFile('profile.bmp', image);
PHP
# You would need to obtain an accessToken using your chosen auth flow
$api_client = new \DocuSign\eSign\client\ApiClient($base_path);
$config = new \DocuSign\eSign\Model\Configuration($api_client);
$config->addDefaultHeader('Authorization', 'Bearer ' + $access_token);
$users_api = new \DocuSign\Api\UsersApi($config);
$image = $users_api->getProfileImage($account_id, $user_id);
$image_file = new SplFileObject ('profile.bmp', 'w');
$image_file->fwrite(image);
Python
# You would need to obtain an accessToken using your chosen auth flow
api_client = ApiClient()
api_client.host = base_path
api_client.set_default_header('Authorization', 'Bearer ' + access_token)
users_api = UsersApi(api_client)
image = users_api.get_profile_image(account_id, user_id)
image_file = file.open('profile.bmp', 'wb')
image_file.write(image)
image_file.close()
Ruby
# You would need to obtain an accessToken using your chosen auth flow
config = DocuSign_eSign::Configuration.new
config.host = base_path
api_client = DocuSign_eSign::ApiClient.new config
api_client.DefaultHeader['Authorization'] = 'Bearer ' + access_token
users_api = DocuSign_eSign::UsersApi.new api_client
image = users_api.get_profile_image(account_id, user_id)
IO.binwrite('profile.bmp', image)
I hope you found this useful. As usual, if you have any questions, comments, or suggestions for topics for future Common API posts, feel free to email me. Until next time...
